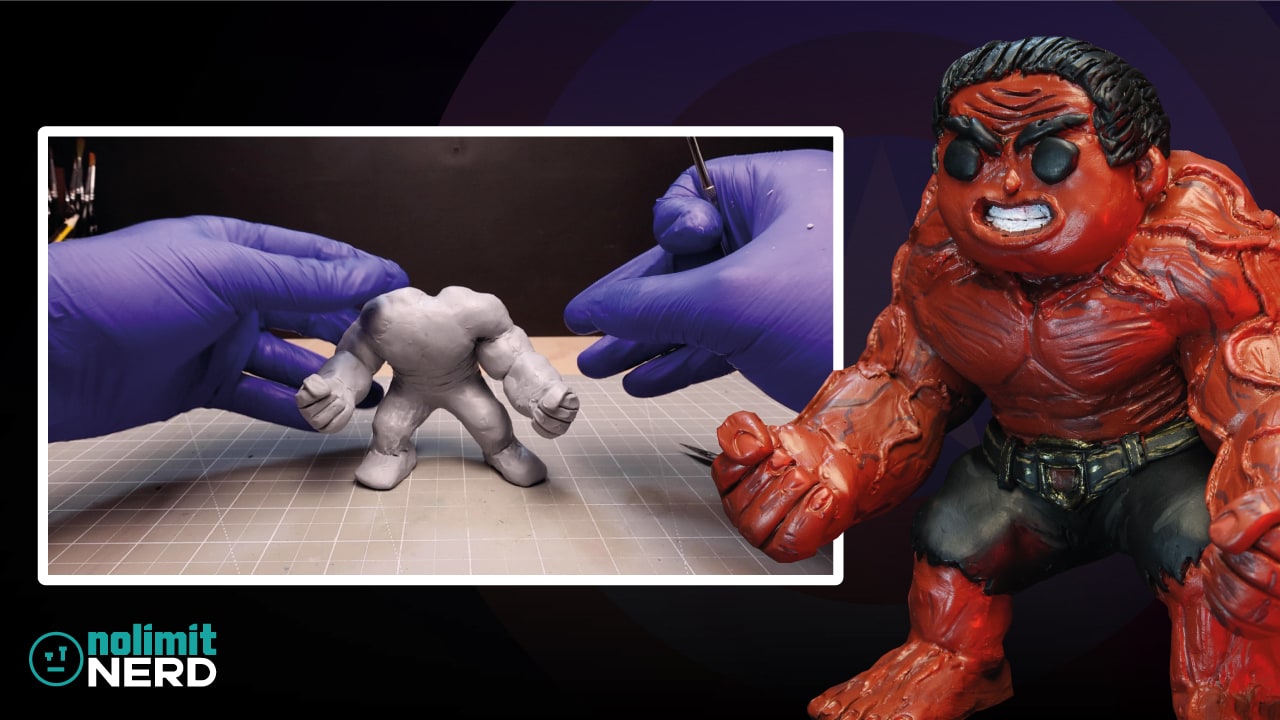
How To Make Marvel RED HULK Figure with Funko Pop! Twist (Using Polymer Clay)
What happens when Marvel meets Funko Pop and gets completely roasted in the sculpting studio? You get this glorious Red Hulk with a Funko Pop head. A one-of-a-kind, slightly unhinged, absolutely jacked clay creation that screams, “I’ve skipped leg day… never.”
In today’s anti-hero inspired tutorial, we will dive into a fun and exciting project: crafting a Marvel Red Hulk figure with a unique Funko Pop-inspired head!
Inspired by the release of the Captain America: Brave New World movie featuring Harrison Ford as General Ross who in turn turns into the Red Hulk.
Except instead of Harrison Ford’s head, I decided to make a special twist to this project as my miniature head sculpting skills very much need refining.
So, if you’re a fan of superheroes and love polymer clay, this project is for you. Whether you’re looking to create a standout piece for your collection or challenge your sculpting skills, this step-by-step guide will help you bring this iconic Marvel character to life.
Grab your clay and your sculpting tools, and let’s get started on making this larger-than-life Red Hulk figure in miniature form!
Step 1. Materials Needed for Your Red Hulk Figure
I start this Red Hulk project like I do many of my other polymer clay sculptures, making sure I have what I need to hand so that I don’t waste time finding stuff when I’m in the middle of sculpting.
To do this, you’re going to want to grab yourself your sculpting tools. I find a few of the metal wax carving tools work great on polymer clay. You might also want to get some silicon brushes to help with smoothing, Cosclay, isopropanol alcohol for smoothing out fingerprints, and, of course, a selection of paints and paintbrushes for painting the Red Hulk.
Once you’ve collected your tools, you’ll want to ensure your workspace is clear from dust and dirt that will no doubt stick to your clay, and then you can start conditioning your clay.
Materials You’ll Need:
- Armature wire (and probably a pair of gloves if you don’t want to get nipped)
- Tin foil (hoard it like a sculptor squirrel)
- Polymer clay (in skin tone, red, black, and whatever else floats your nerdy boat)
- Pasta machine (for clay—not dinner)
- Sculpting tools (especially a ball stylus and a scalpel for finer detail)
- Acrylic paints (red, black, white, gold, purples—oh, and patience)
- Black spray primer
- Optional: masking tape, aka DIY Hulk-sized nappy
Step 2. Step-by-Step Guide to Sculpting the Red Hulk Body
The next step is to get your clay ready for sculpting.
To condition your Cosclay, you’ll want to cut a piece off the block and work it in your hands to soften it. Then if you have a pasta maker to hand give it a roll through that a few times, otherwise a rolling pin is just as good but a little more of a work out on your arms is needed.
Once you’ve done shaping your torso, it’s time to start on the Red Hulks figure.
2a. Build the Beefy Skeleton
Start with armature wire and bend it into a rough Hulk shape. Think arms, legs, and torso. Give it a snip (or don’t, unless you want to mess it up like I did).
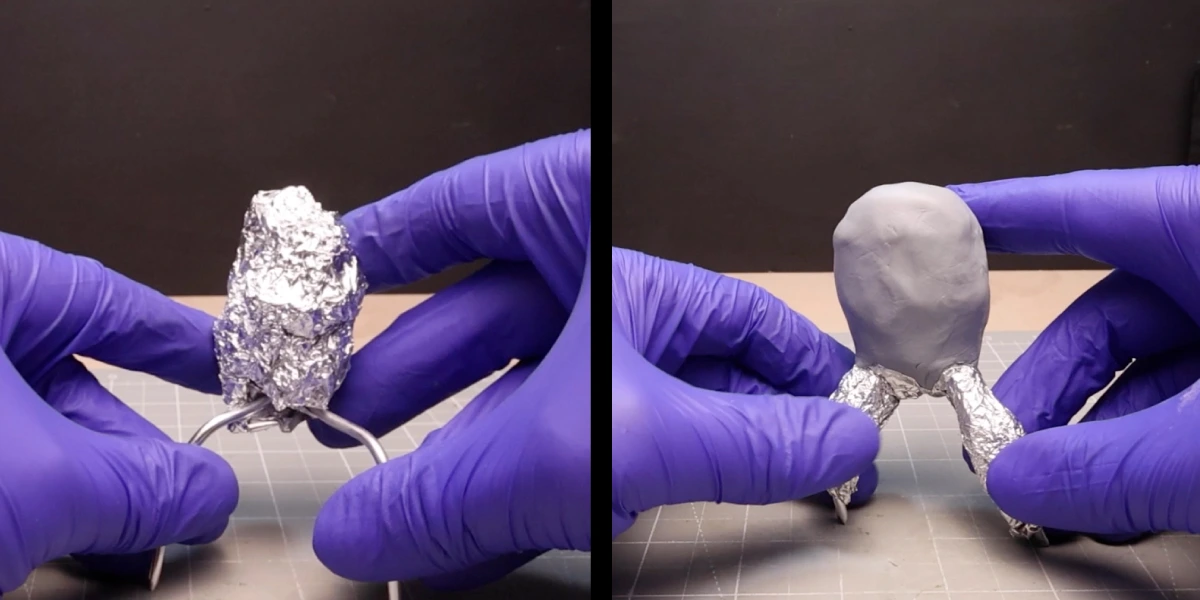
Wrap your skeleton wire with foil to pad out the main area of the beefy Hulk torso. This also helps to save some clay in the process, as clay costs money.
Once you’re happy, it’s time to cover the body in clay to hulk it up a bit more. After you’ve created the body, wrap the legs in foil to give them a base shape and then in a layer of clay, too.
With the rough shape of the body and legs now made, it’s time to add some feet.
Step 3: Add Those Feet
For the feet, you’ll want to squish some chunky blobs of clay together and roughly shape them into feet.
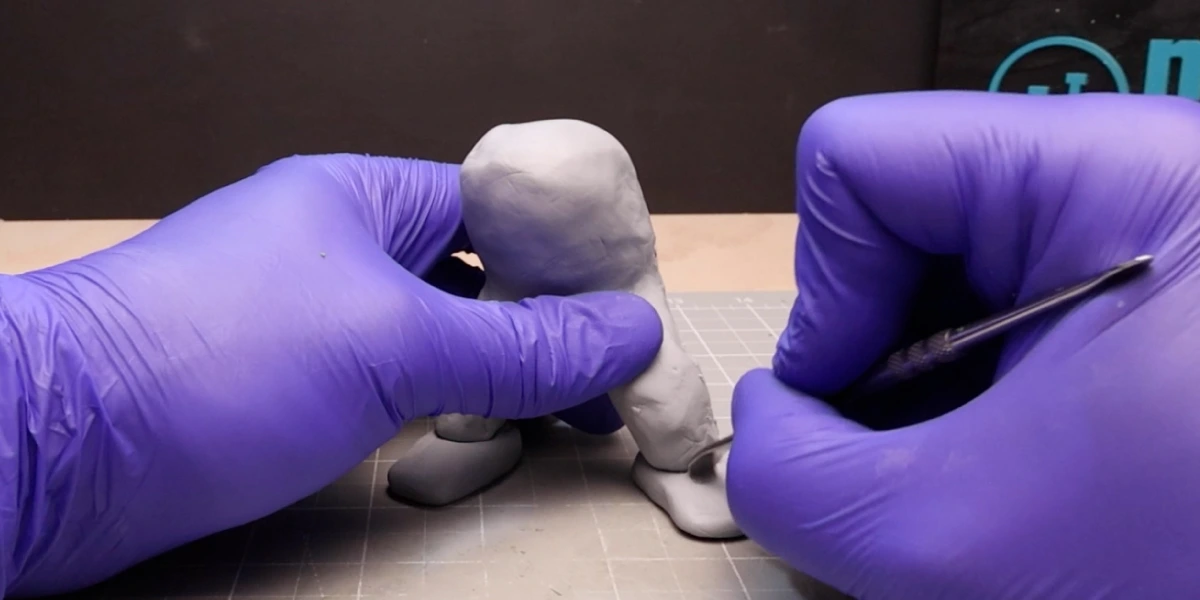
After that, you can attach them to the leg ends and smooth them into the rest of the legs to secure them with a good squidgeroo (my very technical term) and your sculpting tool.
With the Red Hulk’s feet attached, it’s time to move on to the arms.
Step 4: Get to the Arms (and Muscles)
Repeat the armature wire/tin foil/clay wrap routine for each arm, ensuring to leave a little extra wire poking out at both ends so you can attach it to the top of the body and add some extra large hands.
Squidge some muscle definition into the clay because, let’s face it, Red Hulk doesn’t skip a day at the gym. Actually, thinking about it, he probably does because he’s a radiated superhuman.

With one arm roughly positioned, it’s time to add pecs, abs, and more pecs to the torso before attaching the arms securely to the body, blending it all in, and making sure those biceps are bursting.
You can repeat the process for the other arm before adding a blob of clay for each hand, roll out some little clay worms for fingers, and stick them on. Blend and boom, fists of fury, ready and waiting for action.
Step 5: Sculpt the Shorts (AKA Hulk’s Humble Pants)
There’s not much clothing to add to the Red Hulk because, like the Green Hulk, he’s gone for a very topless fashion statement, wearing just some torn trousers, which, in this case, we will call shorts or humble pants if you like.
To make the shorts you’ll want to roll out a block of clay with your pasta maker, cut it to size, and wrap those thunder thighs. Merging a few flat pieces to form his shorts.

It’s then time to go full on “rage” and tear those shorts up using your scalpel or sculpting tool to give the bottom edges of the shorts a torn-up effect.
With the base of the shorts complete, you’ll want to cut some thin strips of clay to use as the belt. Wrap it around towards the top of the shorts, merging it together at the ends. Cut some thinner strips to add as belt straps, makeshift your own belt buckle, and attach it into place.
Interlude
At this point, I needed to attach my model to a board to help support him so that I didn’t keep ruining any detail that I had already put in with my chubby fingers.
So I snipped off the feet I had already added and inserted some 3mm armature into a piece of plywood to use as the base support. I then pushed the body of the Hulk into the base and added back in the feet and bottom part of the legs.
You could have skipped having to do this if you added the armature to a base in the first place or kept the armature wire a little longer.
Step 6: Make the Head (Version 2.0, Because Plan A Sucked)
I tried making the head realistic, but my sculpting skills just weren’t up to scratch. It looked more like a constipated boxer than the Red Hulk.
So, it was time to pivot. After a little research, I came across the Funko Pop models, and I thought, “Let’s just go full Funko Pop style for the head, as it will fit in nicely with the overall bulk of the body.”
To do this, it was time to grab a block of clay and shape it into a cuboid (3D Rectangle). With the basic shape created, it was then time to add some sticky-out ears to each side, a small nose in the middle, and a hole for the mouth, using a sculpting tool.
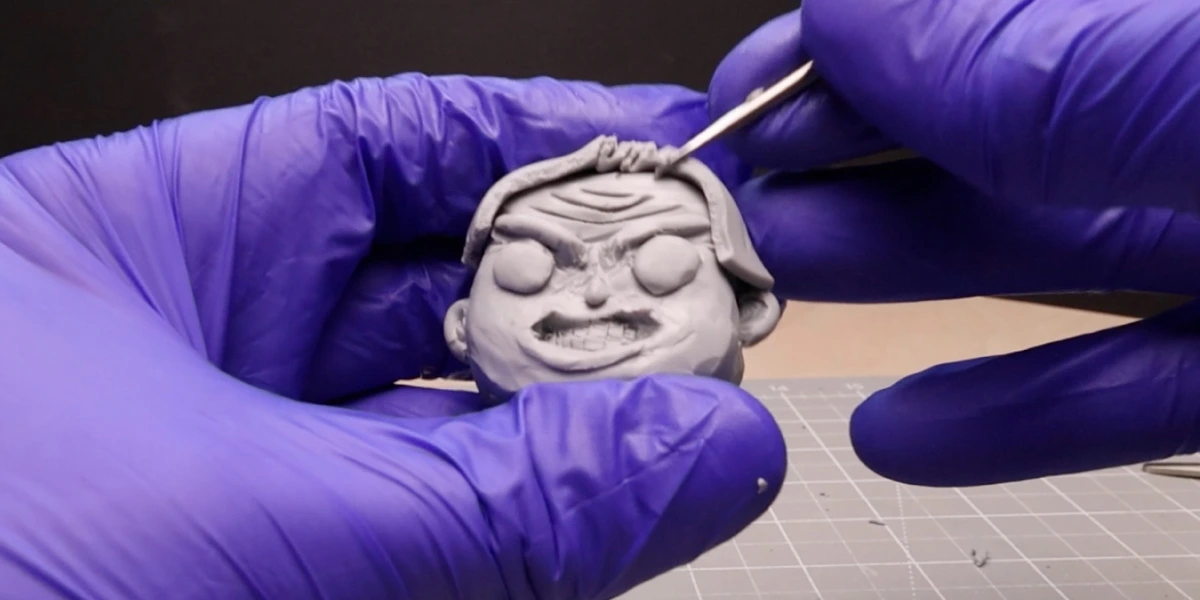
I added a clay worm into the mouth and some toothy definition for the teeth.
I rolled up a couple of oversized eyeballs and squished them flat into place, made some small worms for eye brows and added a few angry crease lines to his forehead.
After that, you’ll want to get a sheet of clay for the hair and blend it in. It’s not quite Marvel or Funk Pop approved, but it has some personality.
Step 7: Attach the Head to the Body with More Muscles
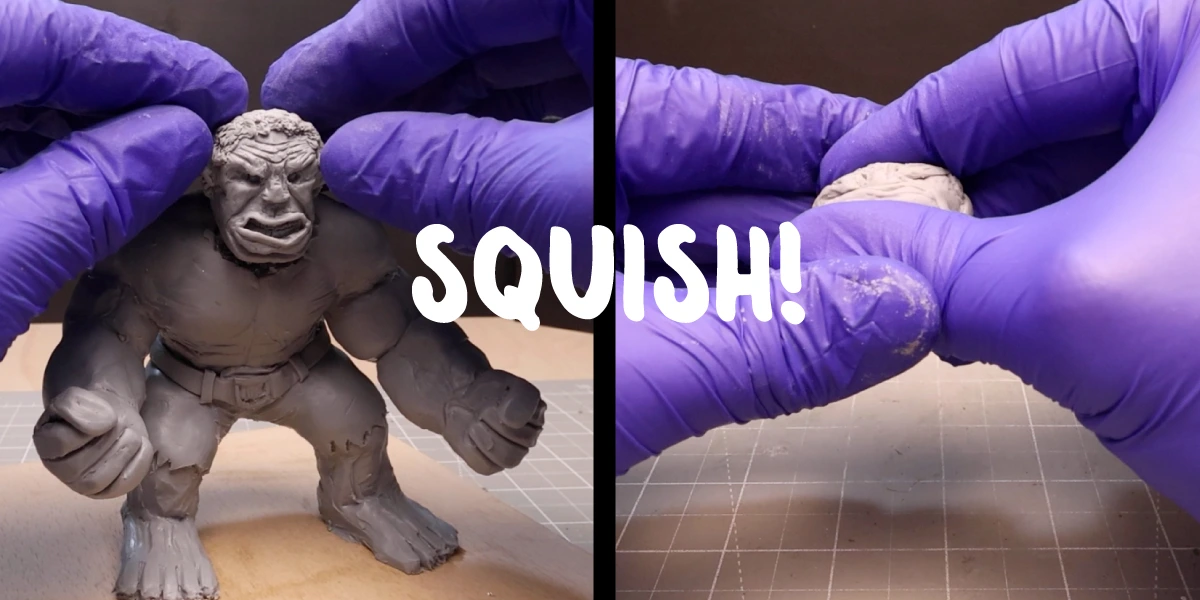
One thing I like to tell people is, “Don’t be afraid to cut your model!” Using polymer clay, you can redo or fix pretty much anything, so don’t be afraid to make mistakes, chop things up, and redo them over and over and over again until you’re happy.
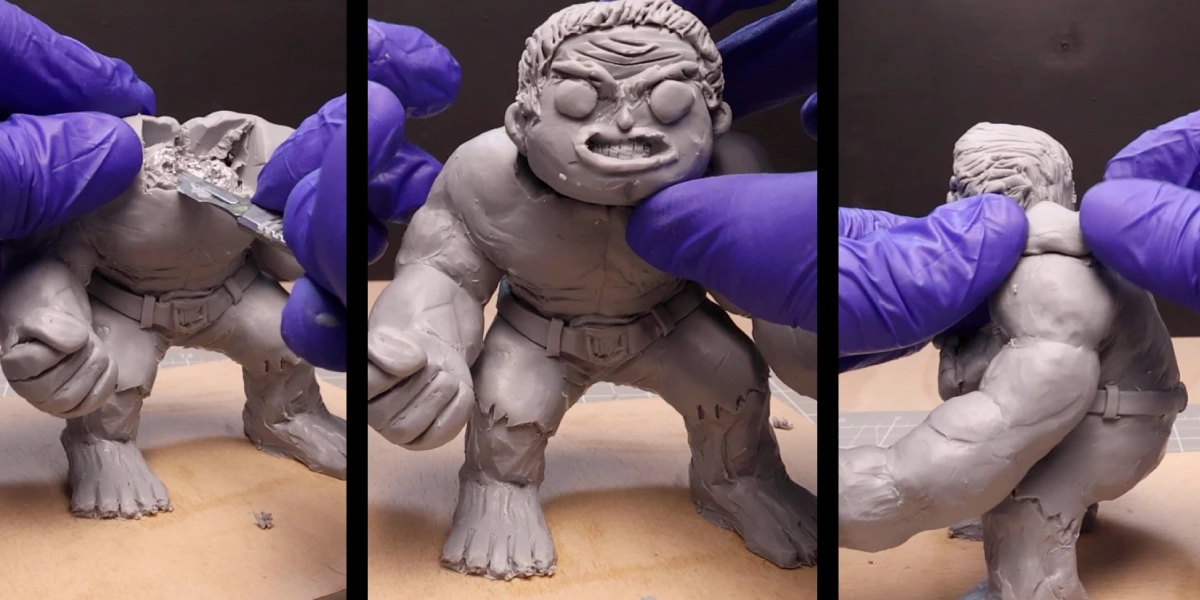
In this case, you’ll need to open up the neck area, remove some foil if needed, and pop that big ol’ melon we just created with a smack bang on top.
Once you’ve done that, add some clay to blend the head and body together, and yes, more muscles around the neck and shoulders to exaggerate this character’s beefiness.
Because Red Hulk isn’t complete without trapezius muscles that look like tectonic plates.
Step 8: Adding the Veins (AKA Wrath Worms)
No Hulk figure would be complete without adding detail that showcases just how much muscle mass they have compared to us meager folk who need to work out a little more.
For these added vein details or wrath worms, if you like, you’ll need to roll thin clay worms of various sizes and apply them in chaotic, pulsing patterns all over your arms.
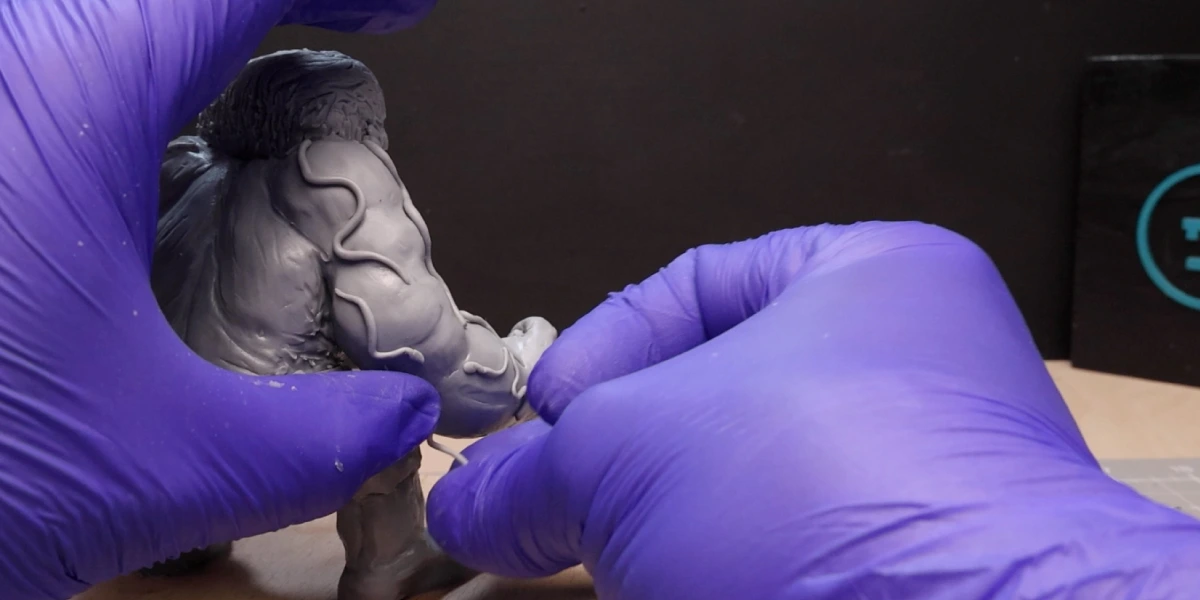
Use your ball stylus to blend them into the skin and smooth them out a little. There you have it, instant Hulk rage energy applied.
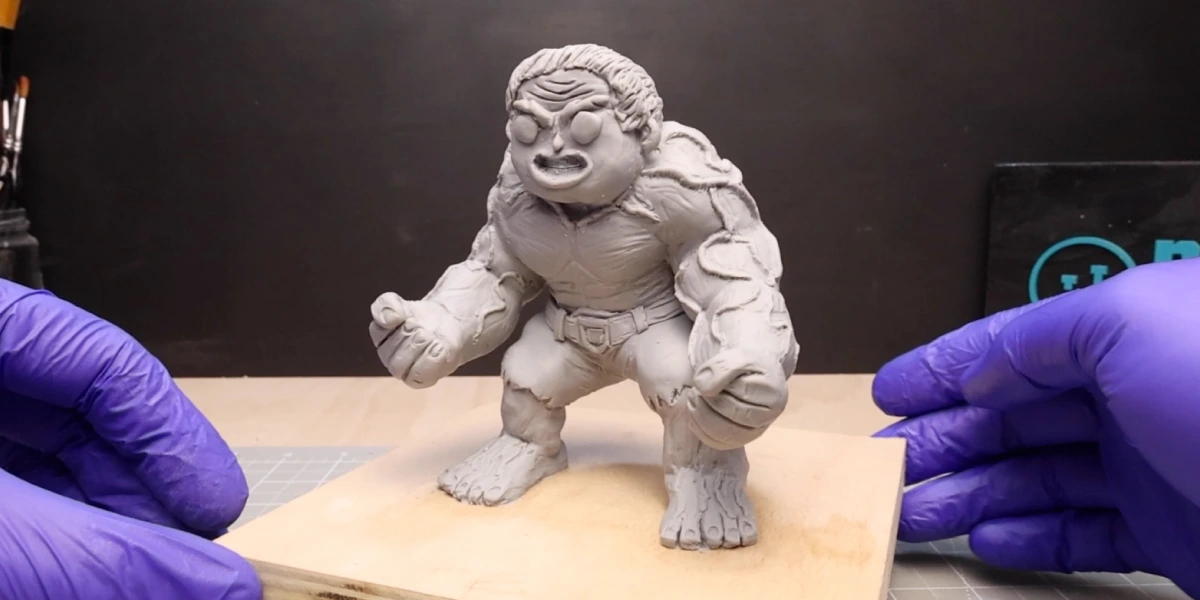
After that, it’s time to add a few finishing touches, change anything you don’t like, and give it a quick brush of isopropanol to smooth off any fingerprints. Then, it’s time to bake.
Step 9: Baked to Perfection
If you’re using CosClay Polymer Clay like I did, you’ll want to ensure that you bake it at the right temperature and for the right time.
In this case, the Red Hulk figure is quite beefy, so it needed more time than, say, my Christmas Krampus figure, for example, which is about 60 minutes at around 275 Fahrenheit. Be sure to check the requirements of the material you’re using and ventilate appropriately.
Step 10: Prime and Paint
With the figure now baked and cooled, it’s time to prime and paint.
To prime it, I used my trusty cheap airbrush and Vallejo black primer, which unfortunately took 12 hours to dry for me. However, when it does, it shrinks to the figure, ensuring that the detail you’ve added is retained, making it great for more detailed characters and figures.
You might want to do this this step the night before unless you enjoy watching paint dry. Literally.
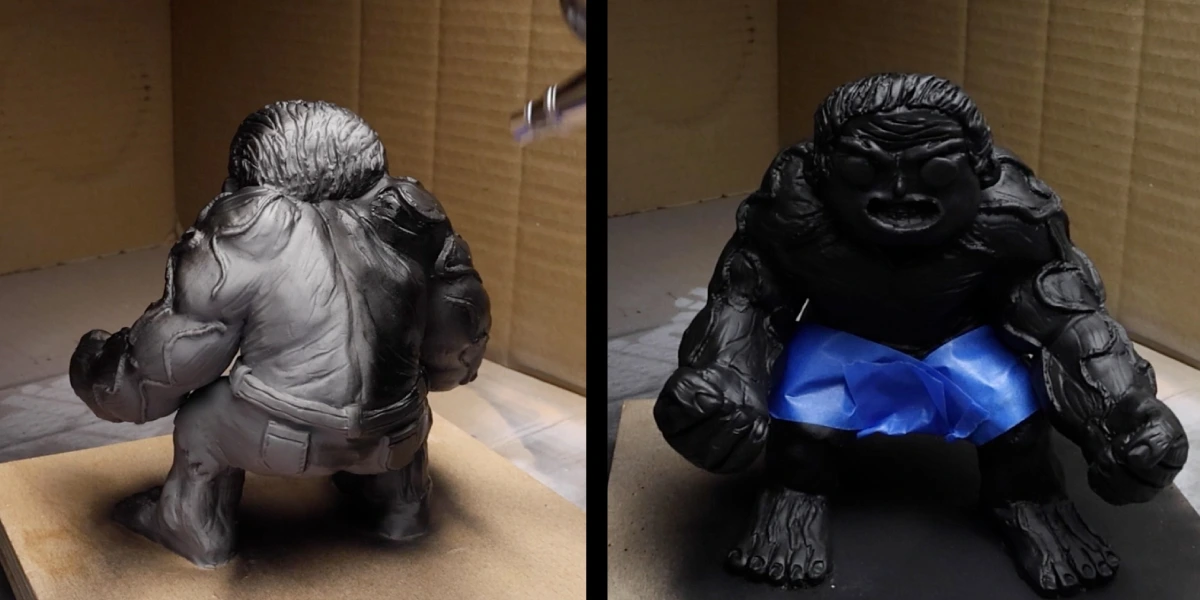
Once primed, use masking tape to cover the shorts (yes, we’re making Red Hulk a tactical diaper) and spray the rest with a mix of blood red and black. On black primer, it comes out dark and broody, just like our big angry boy.
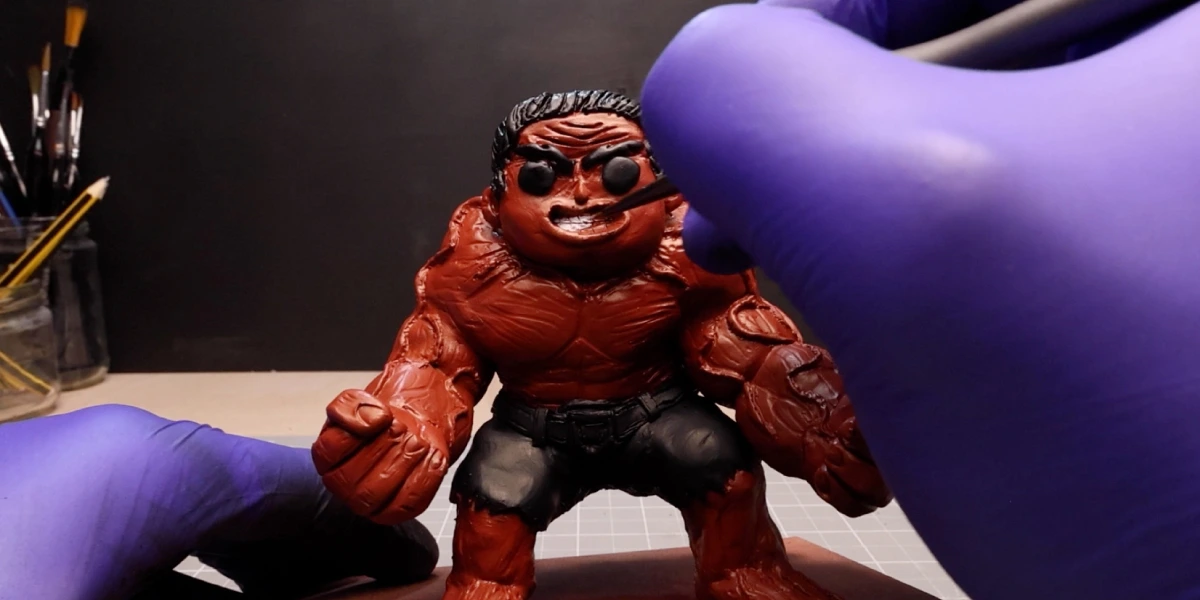
10a: Final Painting Touches
- Shorts & Hair: Use black acrylic. Touch up where needed.
- Eyes & Eyebrows: Went with black for full Funko effect.
- Teeth: White acrylic with a fine tip brush. Two coats for that pearly finish.
- Veins: Mix a light, purply tone to highlight those sculpted veins.
- Muscle Lines: Define with the same purple to make everything pop.
- Nails: Light red. Angry manicure complete.
- Belt & Buckle: Add red, dark red, and gold for stylish destruction.
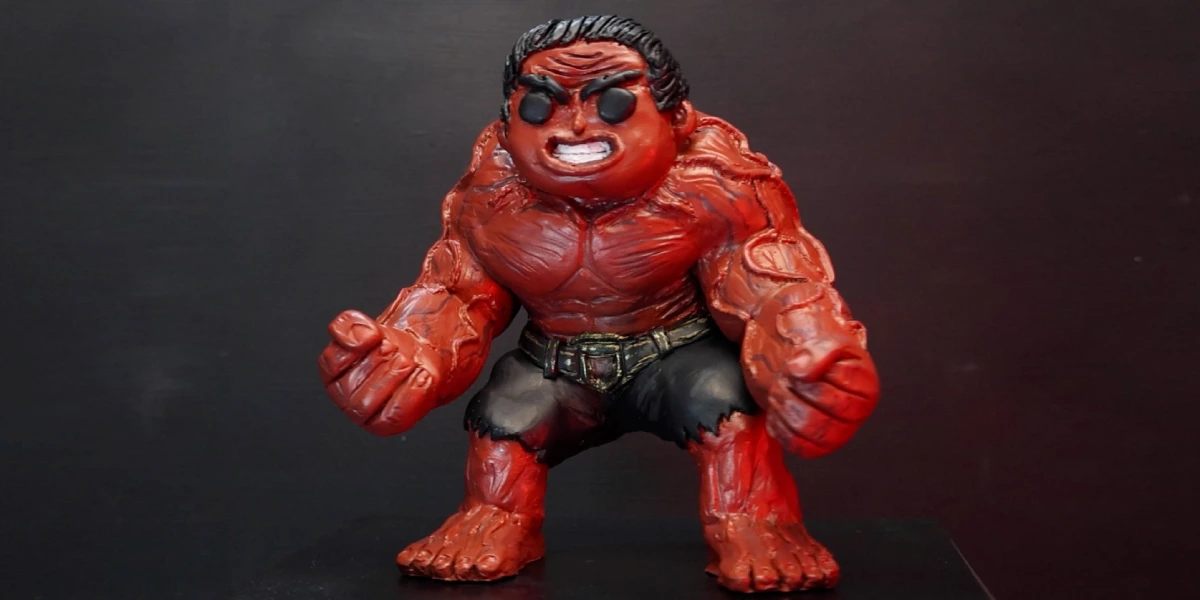
With everything now painted, it’s time to give it a quick coat of clear matt varnish to protect it. Hey presto, it’s time to congratulate yourself on a job well done.
The End Result?
A terrifyingly adorable mashup of Marvel power and vinyl charm. Presenting: Red Hulk with a Funko Pop-style head, full polymer clay glory, and muscle definition that would make a gym bro weep.
Now It’s Your Turn
Think you can top this monstrous masterpiece? Grab your clay and go bananas. And if you do, tag me @nolimitnerd as I want to see your chaotic creations.
Like what you see? Drop a comment on my YouTube Channel, give a thumbs-up, and check out the rest of the nerdy madness here on No Limit Nerd.
Tools I Used
Heads up. Some of these links are affiliate links if you click on them and buy something I might make money which will help you support NoLimitNerd at no extra cost to you.
Sculpting Tools
- CosClay
- A2 Cutting Board
- Pasta Maker
- Sculpting Tools
- Modelling Tools
- Vinyl Gloves
- Armature Wire 1mm
- Armature Wire 3mm
- Super Glue
Painting Equipment
- Paint Brushes
- Acrylic Paints
- Valejo Airbrush Thinner
- Air Brush Kit
- Air Brush Cleaner
- Gas Mask
- Acrylic Gloss Varnish
Filming, Audio & Tech
- Cannon EOS R8 Camera
- Cannon RF 50mm Camera Lens
- Lexar 128GB SD Card
- Softbox Lighting with Diffuser
- Camera Tripod Ball Head
- NEEWER Led Lights
- Fifine Microphone (USB)
- Rotating Display Turntable
- Black Backdrop Cloth
- Microphone Arm – for Overhead Camera
Recent Projects / View All Projects
How to Make a Miniature Cloaked Figure from The Traitors TV Series (Polymer Clay)!
How To Make Marvel RED HULK Figure with Funko Pop! Twist (Using Polymer Clay)!
How To Make a Mini Christmas Krampus Figure using Polymer Clay!